About
The BaristaBot 2.0 is a coffee-making robot that shows the beauty in the process of making a cup of coffee.
The BaristaBot2.0 is a new take on the original BaristaBot,
which aimed to fully automate the coffee brewing process with an assembly-line-style aesthetic.
For our iteration, we decided to aim for an open-view, more compact experience that not only dispenses coffee,
but the additional capability to add milk, sugar and stirring.
System Integration
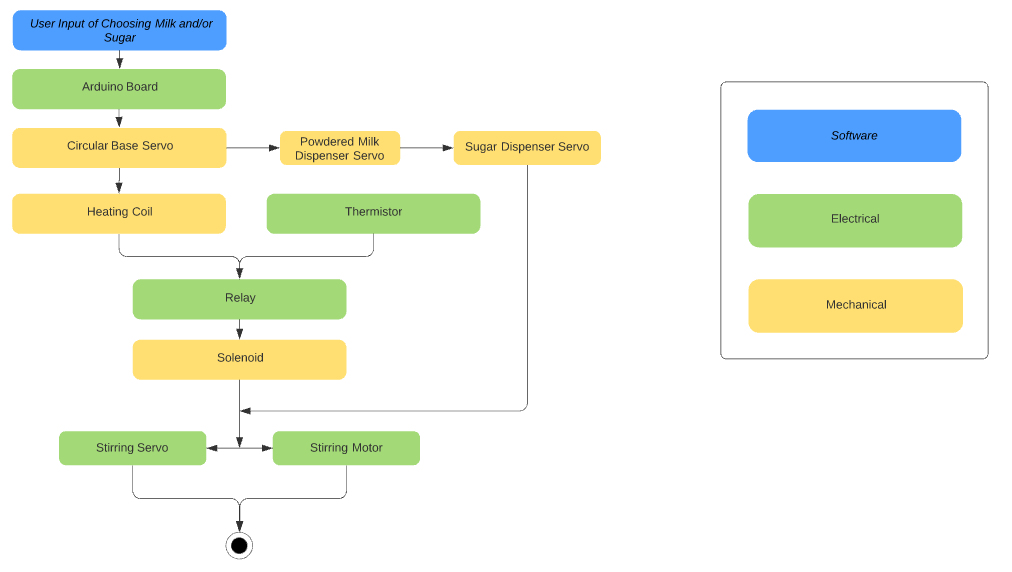
As seen in our total system above, our mechanical, electrical, and software work together to create the BaristaBot.
The software receives input from the user of what ingredients they wish to place in their cups and communicates
with the electrical components through the Arduino to trigger events that get supported from the mechanical portions
of the project. The Arduino communicates to the cup surface servo to start rotating to go towards the four stations: coffee brewing, milk dispensing, sugar dispensing, and stirring.
The coffee brewing communicates to the heating coil to the thermistor, which is able to tell the temperature of the water inside the container.
If the water is not at the ideal temperature, the heating coil will start boiling the water until the thermistor indicates that the ideal temperature has been reached.
The relay will trigger for the water to be dispensed over the coffee grinds, which will brew the coffee into the cup through the solenoid.
The cup surface servo will rotate towards the milk and sugar dispensers, depending on whether or not the user chose both or only one of the ingredients, where the servo will turn and dispense the ingredients.
Whether or not the user wishes for milk and/or sugar in their drink, the cup will rotate to its final destination at the stirrer. The servo of the stirring mechanism will bring down the stirring motor.
When lowered, the stirring motor will run and stir the drink. When completed, the servo will raise back to its original position and conclude the program.
The Team


 This project was made possible by the BaristaBot PIE Team: Ivonne Munoz (Mechanical Engineering '23),
Daniel Park (Engineering with Computing '24), Charlotte Ramiro (Electrical and Computer Engineering '24'), Moises Sabido Garcia
(Mechanical Engineering '24'), and Merwan Yeditha (Engineering with Computing '24'), shown respectively left to right.
This project was made possible by the BaristaBot PIE Team: Ivonne Munoz (Mechanical Engineering '23),
Daniel Park (Engineering with Computing '24), Charlotte Ramiro (Electrical and Computer Engineering '24'), Moises Sabido Garcia
(Mechanical Engineering '24'), and Merwan Yeditha (Engineering with Computing '24'), shown respectively left to right.
Mechanical
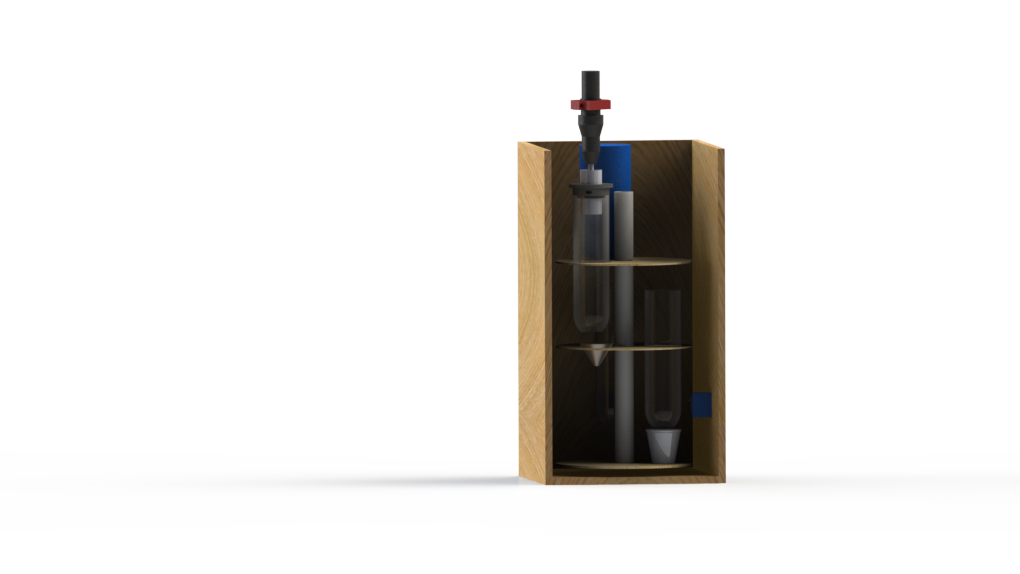
Here you can see the mechanical design of the BaristaBot2.0 from the
housing, bean grinder, ingredient dispensing, and the cup stirrer.
For access to our CAD files, visit
our GrabCAD Page
or request access to the project to msabidogarcia@olin.edu
Housing
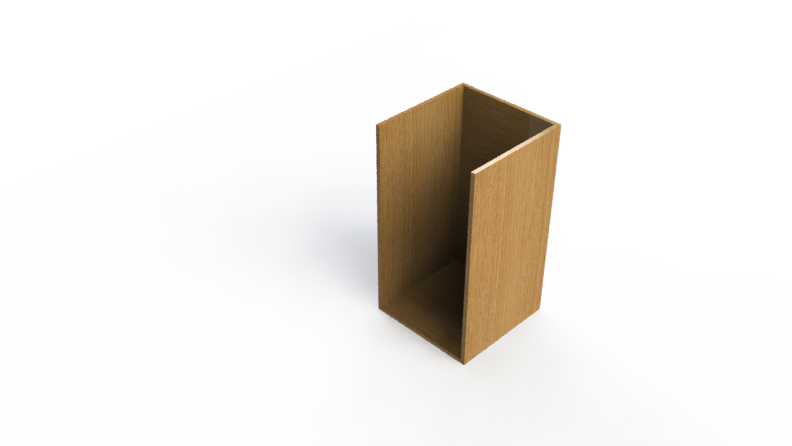
When drawing out what we wanted our final project to look like, a larger
need was to have everything be in a single compact housing. Immediately, we
CADed a box that would fit the dimensions we believed we would need and that
would be viable to create using easy to source material. Based on our budget,
we opted for plywood over a higher quality wood (especially once we went to
purchase it and saw that even the more expensive sheets of wood were extremely
warped). We then took our 4' X 8' sheet and CNC milled it on the "Shopbot" with
very accurate tolerances! To ensure stability, we center drilled many spots on
the finger joints of the box and then inserted wood screws. We also created a
lid but later determined that it was less useful to have it since some of our
elements were taller than what fit inside the box.
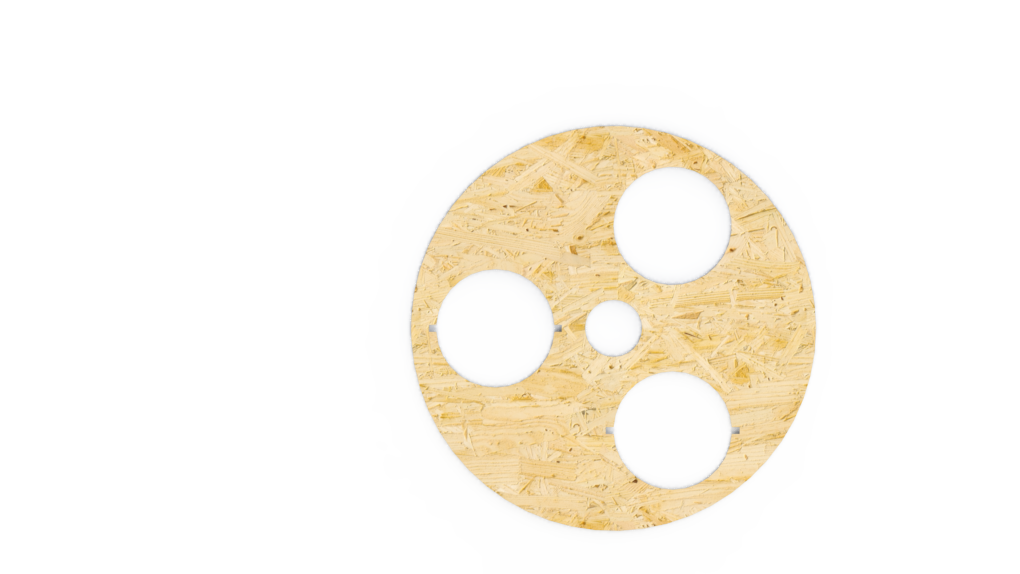
Tiered Design
The inside of the box is a three tiered design, in which the top and middle
tiers are static and the bottom tier rotates. The design is laid out as follows:
Top tier - contains the water heating and bean grinding mechanism
Middle tier - contains the powder creamer and sugar dispensers, as well
as the coffee filter cup that dispenses the coffee
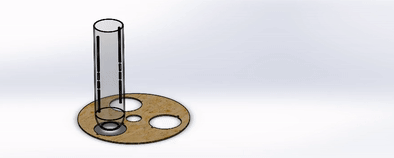
Bottom tier - contains the coffee mug that rotates to each dispenser
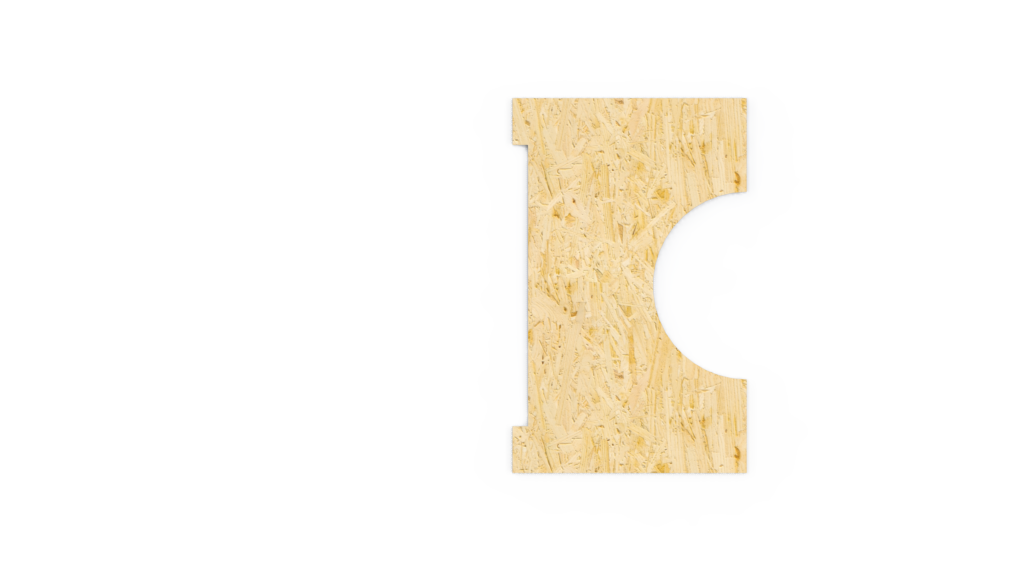 The top and middle tiers have holes relative to the shape of the part or mechanism
that goes on that tier. The top tier has a hexagon-shaped hole for the nut at the
bottom of the water bottle, as well as a circle with two notches across from each
other for the dispenser.
The top and middle tiers have holes relative to the shape of the part or mechanism
that goes on that tier. The top tier has a hexagon-shaped hole for the nut at the
bottom of the water bottle, as well as a circle with two notches across from each
other for the dispenser.
 The middle tier has one regular-shaped hole, and two circles with notches. This design was made so that we could slide the dispensers in and then lock them in place.
Bean Grinder
When seeing how the original BaristaBot team implemented bean grinding, we tried to
create a unique solution. When that did not work, we traced back our steps and
attempted to recreate their solution which was put take a hand bean grinder and
attach a strong 12V DC motor to it. We acquired a hand grinder and stripped it so
that it would fit out purpose.
Later, we harvested a motor from an old cordless hand drill that had a bad battery
as we had tried to grind beans with a smaller 5V DC motor but that failed. Still,
as great as the larger 12V bean grinding motor was, it posed many issues for both
the mechanical and electrical teams. On the mechanical side, it was quite bulky,
heavy, and had a planetary transmission that we had to keep. If we had not kept it,
we would not have been able to connect the shaft of the bean grinder to the chuck of
the drill. We would have had to make out own coupling to connect them and that was
deemed not worth the time. After CADing a mount for both the grinder and the motor,
we connected the two using wooden dowels to constrain the torqy movement of the motor.
For as much as we wanted to have this in the final iteration, we could not keep it in
due to complications in the electrical components needed to power the motor as it
ran at a variable amperage that bounced from 3.5A to 4.8A thus making it difficult to
build a circuit for, especially when we were already doing a complicated one for the
water heating elements.
Ingredient Dispensers
Having had experience with the creation of food safe containers, our team opted to purchase
COTS dispensing containers from Amazon. The containers were originally intended to be used
with cereal, so adjusting them to work with finer ingredients was something that we knew would
have to be addressed. Our solution to that ended up being putting tape on the "flippers". This
would then make the gap between the flippers and the sidewalls of the containers small enough
to limit the amount of spillage. The ingredients we were putting inside these containers were
bean grinds, powdered creamer, and granulated sugar.
These COTS containers were perfect for our team in the sense that we were able to quickly and
easily motorize them. We simply took the handle that had a D-shaft attached to it (which
attached to the flippers), sanded it flat, and put a servo mount that was available to us in
the PIE room. Just like that, we now had motorized dispensers.
For more on how these were mounted in the system, read the section on the housing/tiered system.
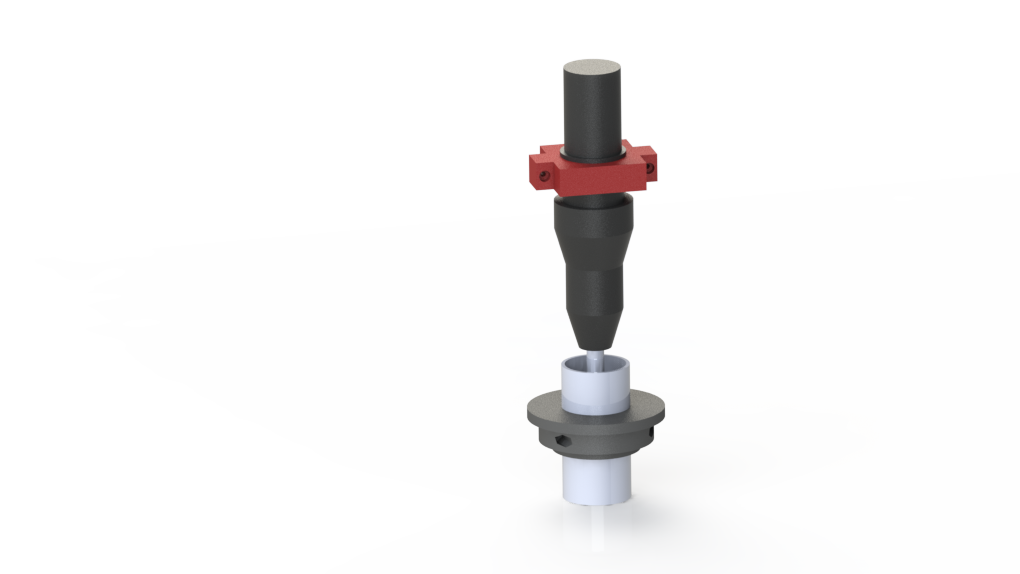
Cup Stirrer
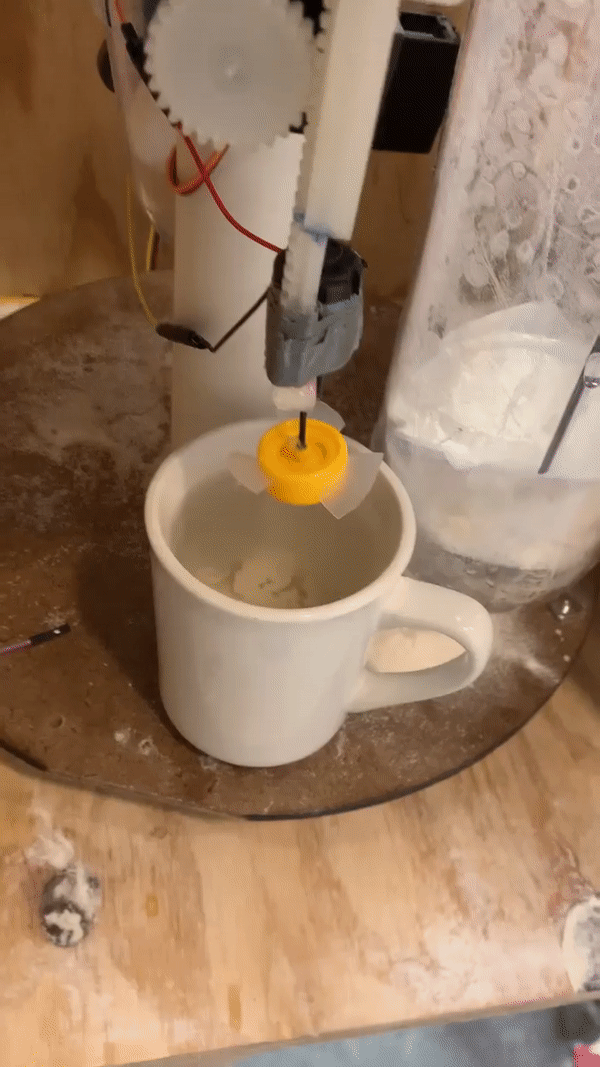
And finally, when all the coffee ingredients are in the cup, the mixer will automatically mix the cup for the user.
With a custom 3D printed rack and pinion system
and a servo controlling the actuator, we were able to move the rod up and down into the cup for mixing.
At the end of the actuator, there was a small 5V motor and modified fan to stir the contents of the cup.
This system was attached to the PVC pipe in the middle to be part of the rotation as the final step of the coffee making process.
Electrical
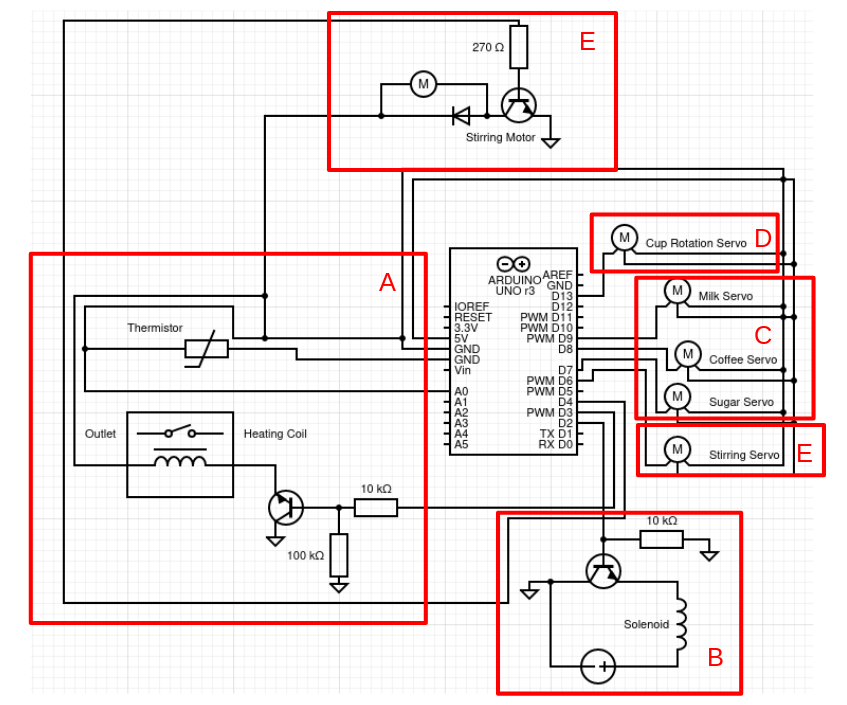
The Electrical System is composed of multiple modules defined by the Arduinos that drives the coffee machine
from water heating, coffee bean grinding, ingredient dispensing, and cup stirring.
A. Water Heating
The water heating system uses a thermistor to detect the temperature of the water as well as an induction heating coil to heat
up the water while it is below 90 degrees Celsius. Since the heating coil is rated with 15 Amps of current, we also used a relay
and NMOS circuit in order to limit the current and be able to safely control the heating from the lower-current Arduino. The
thermistor resistance lowers as the water heats, so we have programmed it such that the Arduino will send a high signal to the
heating coil module until the thermistor's value goes below 80. Once it hits 80, the loop will end, the heating coil will turn off,
and the program will continue to the next steps in brewing the coffee (such as grinding the beans and dispensing the water).
B. Water Dispensing
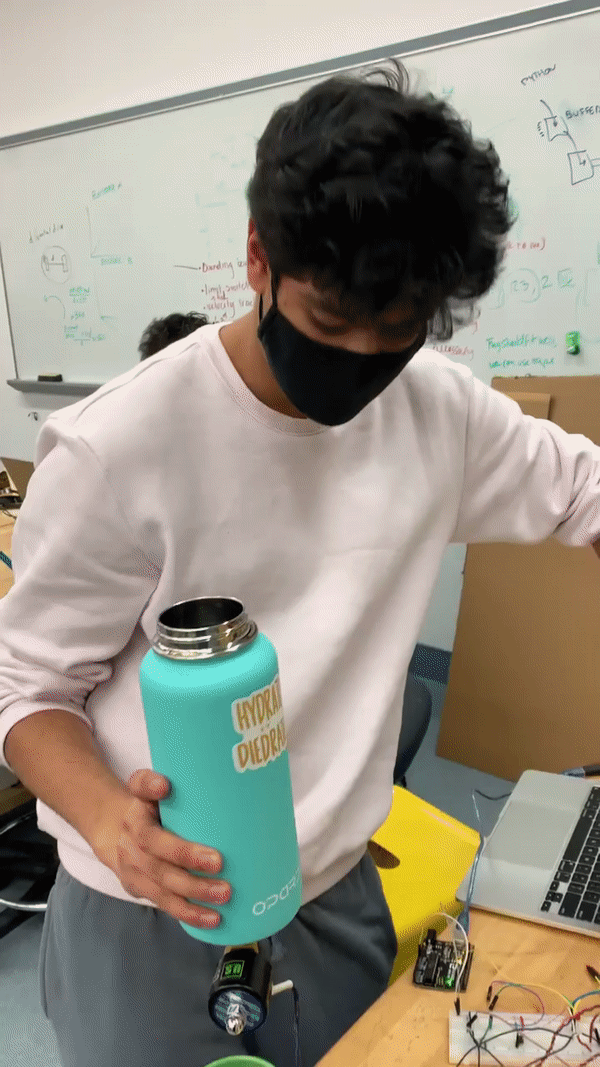
Water dispensing is controlled by a 12 Volt Solenoid. The valve screws into the bottom of the water bottle and
when a high voltage is pushed to the solenoid the valve, the valve opens and allows for water to flow through.
In order to control the 12-Volt Solenoid, we utilized an NMOS transistor. The NMOS transisor's gate is connected
to an Arduino with a 10k Resistor running to ground in parallel. The source is connected to the ground of the
solenoid pin and the drain is connected to the ground of the Arduino. The 12V pin of the solenoid is connected to
a 12V 1.5A power supply, which is also connected to the ground. When the Arduino pushes a high voltage from a
digital pin to the gate of the transistor, the circuit completes and allows for the solenoid to connect to ground
C. Ingredient Dispensing
The powdered milk and sugar ingredients are dispensed using containers and a dispensing mechanism controlled by a servo.
When the ingredient needs to be dispensed, the servo rotates, dropping in some sugar and creamer into the cup.
D. Cup Rotating
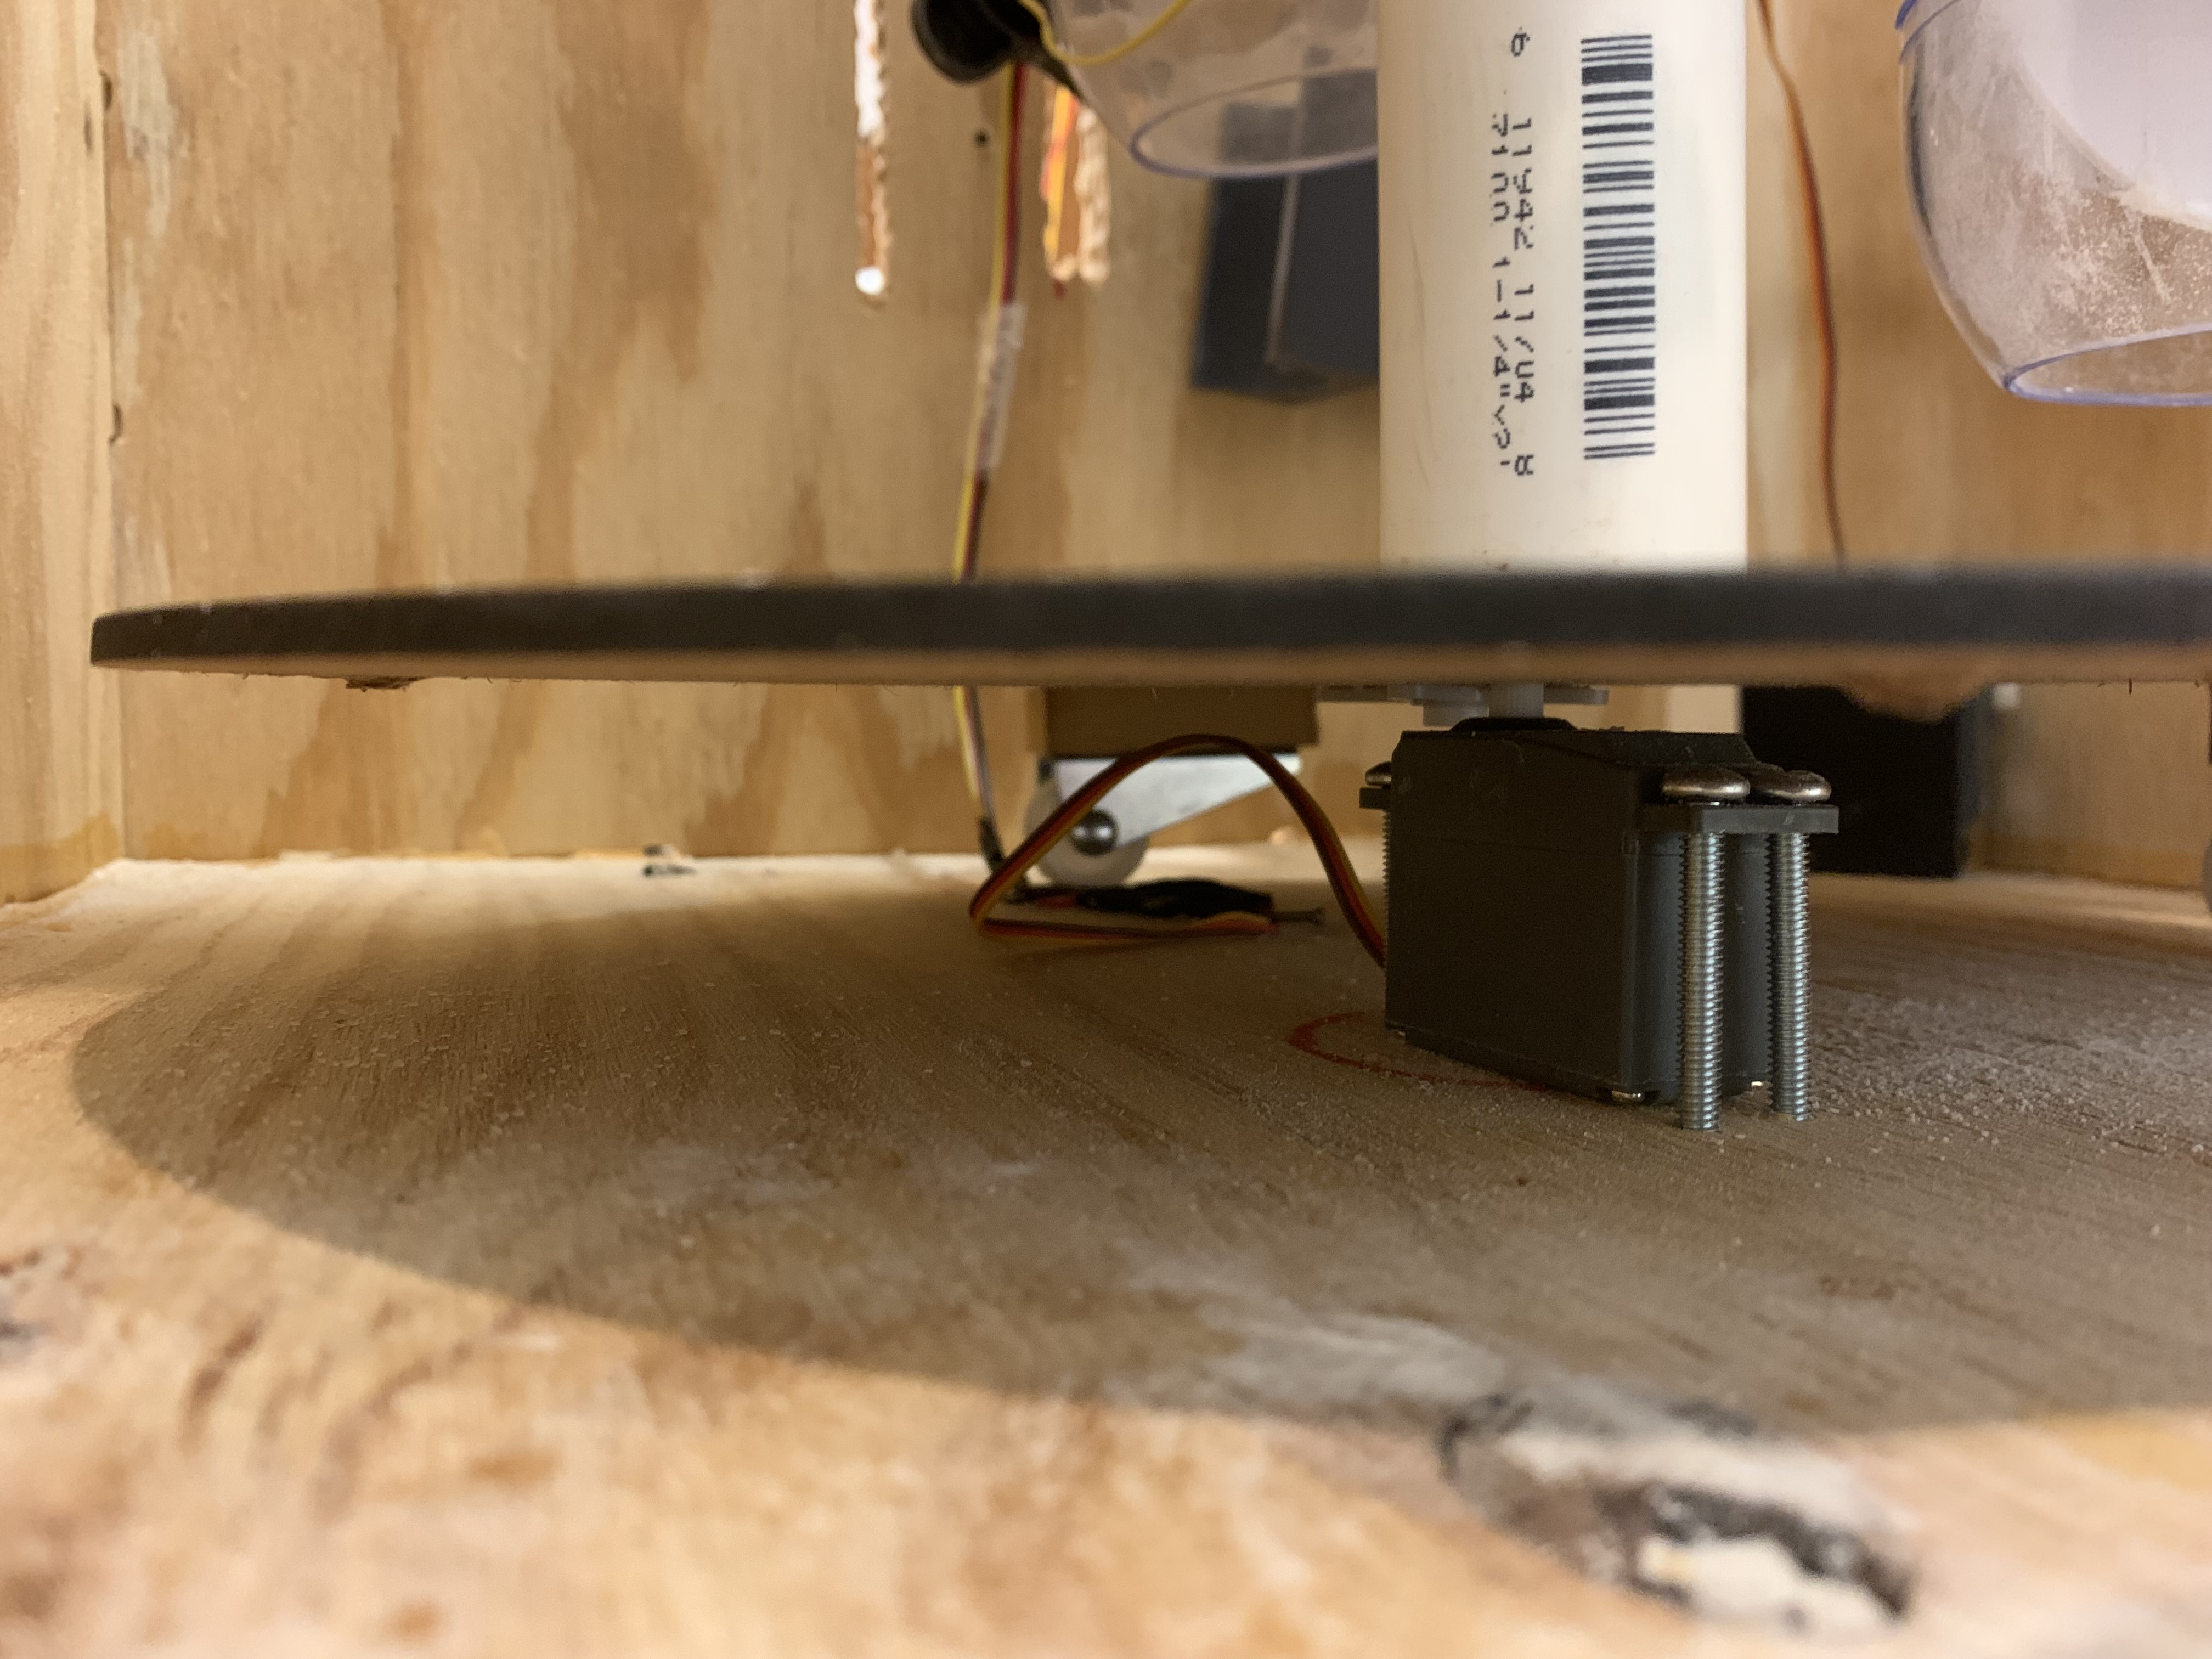
When alternating between the coffee brewer, ingredient dispensers, and cup stirrer,
the surface where the cup is held rotates with a servo that is placed underneath each dispenser.
E. Cup Stirring
As the final step to mix the ingredients together, the mechanism has a actuator that is lowered into a cup by a servo
which has a 5V motor attached to the end of it. This motor spins the rod attached to its shaft that stirs the contents in the cup.
Software
At a high level, the firmware help facilitates all the functions within the electrical components of the BaristaBot.
The image provides an overivew of the streamline process that occurs when the ingredients are poured into the machine,
to the machine brewing the coffee into a cup.
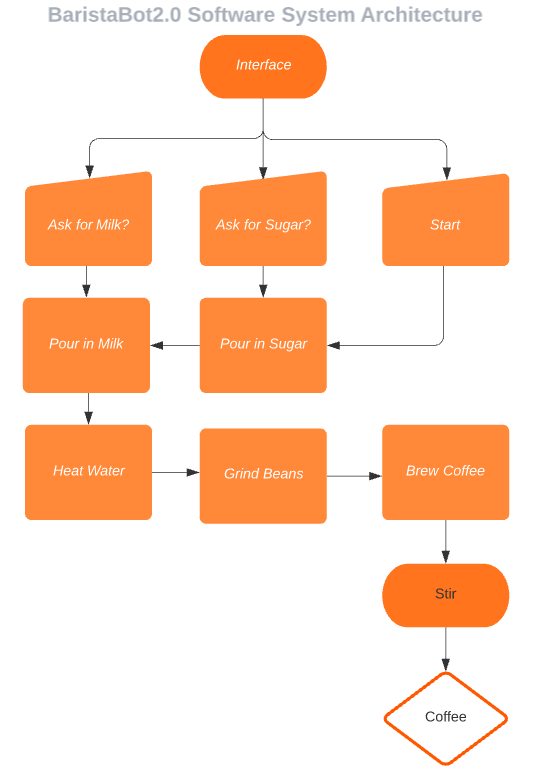
The system starts when the user whether or not they want sugar or milk in their coffee.
Depending on what the user chooses, the machine will dispense the sugar and/or milk into the cup alongside the brewed coffee with hot water and beans.
When all the ingredients are put in the cup, then the stirring mechanism will mix the ingredients together
with the final product of a fresh, hot cup of coffee.
A link to our GitHub repository can be found by on our
GitHub Page.
Budget
| Name |
Description |
Quantity |
Predicted Price |
Price We Paid |
| Arduino Super Starter Kit |
Includes many basic components Such as Arduino, Resistors, Wires, USB Plugs, etc. (Pre-Owned). |
1 |
39.99 |
0 |
| HS-82MG Servos |
Servos used to control the dispensers and the stirring actuator |
4 |
23.99 |
0 |
| 32oz Insulated Water Bottle |
Used for containing the water. |
1 |
18.05 |
18.05 |
| Silicon Water Tubing |
Used for containing the heated water. |
1 |
7.12 |
7.12 |
| Heating Coil |
Used for heating up the water inside the container |
1 |
14.34 |
14.34 |
| Dry Food Dispenser |
For dispensing the grinded coffee beans, powdered milk, and sugar. |
1 |
34.21 |
34.21 |
| Plywood |
Used to construct the structure of the BaristaBot. (Bought from Home Depot.) |
1 |
30 |
30 |
| PVC Pipes |
Holds the structure together through the center. (Bought from Home Depot.) |
1 |
19 |
19 |
| 12V 6A PSU |
Power Supply for the BaristaBot |
1 |
10.95 |
10.95
|
| Adafruit LCD Touchscreen |
Additional Touchscreen Capabilities to Control the Coffee Machine. (Pre-Owned) |
1 |
29.95 |
0 |
| Brass Solenoid Valve |
For dispensing the water into the cup. |
1 |
19.49 |
19.49 |
| ALF1T05 Power Relay |
Power Modulation to switch open and close the circuits to control different parts of the machine such as the water valve and ingredient dispensing. |
1 |
6.22 |
6.22 |
| Silicon Tube Pipes |
For transporting the water from the bottle to the dispenser. |
1 |
6.99 |
6.99 |
| Reusable Stainless Steel Coffee Dripper |
Used for Brewing Coffee by dripping hot water over the grinded beans. (Pre-Owned) |
1 |
12.99 |
0 |
| Coffee Grinds |
Ingredient for Coffee |
1 |
7.49 |
7.49 |
| Powdered Milk |
Ingredient for Coffee (Powdered due to refrigeration issues) |
1 |
10.68 |
10.68 |
| Sugar |
Ingredient for Coffee |
1 |
10.74 |
10.74 |
|
195.28 |
Contact
Elements
Text
This is bold and this is strong. This is italic and this is emphasized.
This is superscript text and this is subscript text.
This is underlined and this is code: for (;;) { ... }. Finally, this is a link.
Heading Level 2
Heading Level 3
Heading Level 4
Heading Level 5
Heading Level 6
Blockquote
Fringilla nisl. Donec accumsan interdum nisi, quis tincidunt felis sagittis eget tempus euismod. Vestibulum ante ipsum primis in faucibus vestibulum. Blandit adipiscing eu felis iaculis volutpat ac adipiscing accumsan faucibus. Vestibulum ante ipsum primis in faucibus lorem ipsum dolor sit amet nullam adipiscing eu felis.
Preformatted
i = 0;

while (!deck.isInOrder()) {
    print 'Iteration ' + i;
    deck.shuffle();
    i++;
}

print 'It took ' + i + ' iterations to sort the deck.';
Lists
Unordered
- Dolor pulvinar etiam.
- Sagittis adipiscing.
- Felis enim feugiat.
Alternate
- Dolor pulvinar etiam.
- Sagittis adipiscing.
- Felis enim feugiat.
Ordered
- Dolor pulvinar etiam.
- Etiam vel felis viverra.
- Felis enim feugiat.
- Dolor pulvinar etiam.
- Etiam vel felis lorem.
- Felis enim et feugiat.
Icons
Actions
Table
Default
| Name |
Description |
Price |
| Item One |
Ante turpis integer aliquet porttitor. |
29.99 |
| Item Two |
Vis ac commodo adipiscing arcu aliquet. |
19.99 |
| Item Three |
Morbi faucibus arcu accumsan lorem. |
29.99 |
| Item Four |
Vitae integer tempus condimentum. |
19.99 |
| Item Five |
Ante turpis integer aliquet porttitor. |
29.99 |
|
100.00 |
Alternate
| Name |
Description |
Price |
| Item One |
Ante turpis integer aliquet porttitor. |
29.99 |
| Item Two |
Vis ac commodo adipiscing arcu aliquet. |
19.99 |
| Item Three |
Morbi faucibus arcu accumsan lorem. |
29.99 |
| Item Four |
Vitae integer tempus condimentum. |
19.99 |
| Item Five |
Ante turpis integer aliquet porttitor. |
29.99 |
|
100.00 |