Electrical

Wiring Diagram
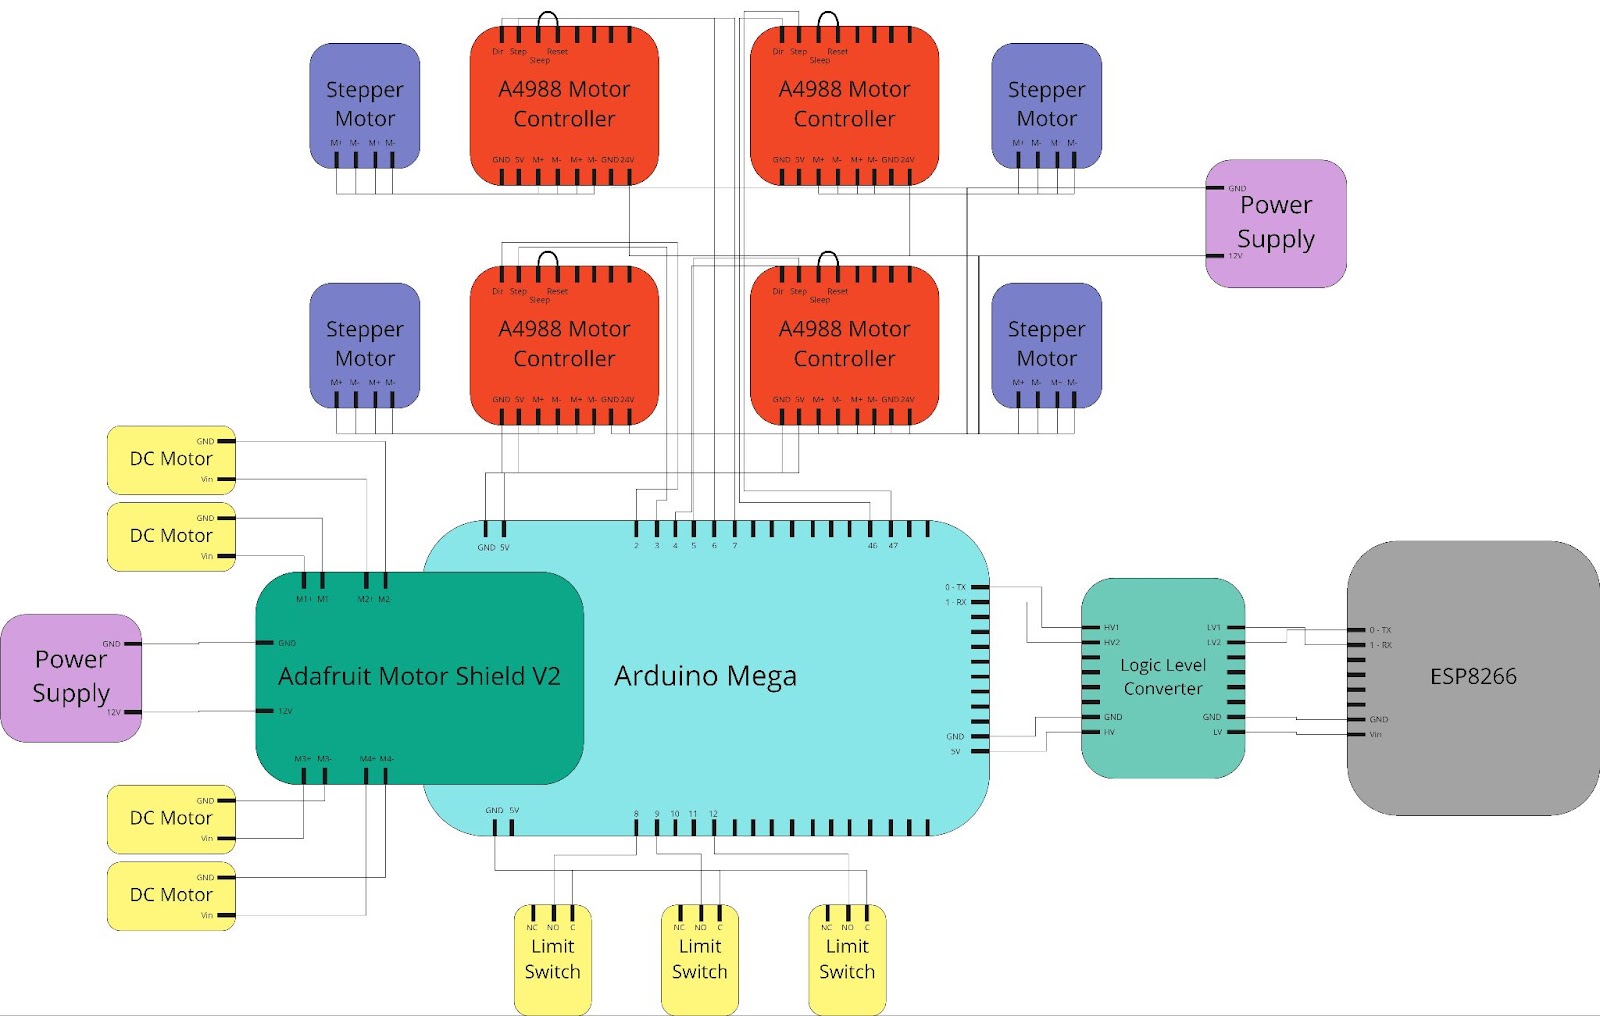
The full wiring for our system can be viewed below:

Starting from the right of the diagram, we used an ESP8266 for our wifi communications. We chose this board for its reliability and widespread documentation. This allowed us to easily connect to the olin devices wifi to retrieve orders. The ESP8266 runs its logic on 3.3v as opposed to an Arduino which operates on 5v. This required a logic level converter to step up and down signals between each board. The logic level converter was simply placed in between the ESP and arduino to convert each signal being sent to the correct voltage. The main processing and controls occurred on an Arduino Mega 2560. This board was chosen because it has many digital pins that allow us to control all of our mechanisms.
To control our stepper motors we used the A4988 stepper motor drivers. These drivers were chosen to provide more control over our motors as well as separate arduino and motor power. As shown in the diagram, the motor drivers are powered with 5v from the arduino, and motor power is provided from a 24v power supply. The 4 motor wires on the stepper motors are connected directly to the motor controller. To control the motors, each motor controller has 2 pins connected to digital outputs on the arduino. These pins control the stepping and direction of the stepper motors. We originally ran our motor controllers with 12v and had them tuned to a reference voltage that gave our motors 1A. After problems with the gantry, we increased the voltage to 24v and adjusted the reference voltage to 2A. This gave our motors more torque and helped resolve some problems with lack of power.
For our gantry we used bipolar nema 17 2A 59Ncm stepper motors. These motors were chosen due to their small and light form factor relative to their power output. We chose stepper motors to allow for precise control of the gantry system.
A larger bipolar nema 17 65Ncm 2.1A stepper motor was used to open the kettle valve. We chose this motor because it had higher torque than our other motors, and it could easily integrate with the parts that we had. In the future we would like to replace this motor with a higher torque DC motor.
An Adafruit Motor Shield V2 was used to control 4 DC motors. This board was chosen because it integrated well with our existing electronics and had a well documented library. This board was connected directly to the Arduino Mega 2560 We powered this board with a separate 12v power supply. The DC motors used were chosen as they were already accessible in the class, and we had experience using them. We used 1:48 reduction ratio 200RPM dual shaft gearbox DC motors. Given more time and budget, we would replace these motors with a higher torque alternative to remedy occasional issues with stalling.
We had 3 limit switches wired directly to the Arduino. These limit switches were connected to a digital pin and ground. This allowed us to measure when a switch was activated as the connect pin was brought down to ground. These were mounted on the gantry for calibration.