
Cyberflex
Cyberflex
Our software team was very intentional in achieving their learning goals of understanding motor movement
The main firmware for this project is Arduino Code written to:
1) Read sEMG sensor data
2) Transfer it to our python script which is doing the live detection of signals (see software page) and have that python script predict what the gesture is
3) Receive the gesture prediction from the python script and move motors connected to motor shields
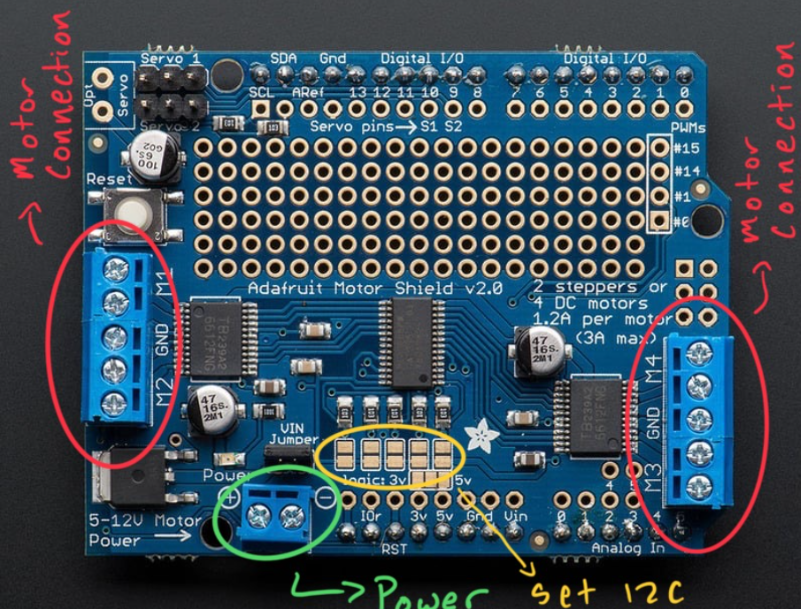
Starting off, we must first initialize our motors shields, which in this case, we have three of. Each of them have a unique I2C address which we must also account for in our initialization. To map to the proper address, we must solder the pads above the power pins in the image below. 0x60 corresponds to no pads soldered, 0x61 to the first pad soldered, and 0x62 to the second pad soldered. We can then simply stack the motorshields on top of each other.
The initialization can be done in code like this:
Adafruit_MotorShield AFMS1 = Adafruit_MotorShield(0x60);
Adafruit_MotorShield AFMS2 = Adafruit_MotorShield(0x61);
Adafruit_MotorShield AFMS3 = Adafruit_MotorShield(0x62);
As seen above each motorshield also has 4 locations to place DC motors (M1, M2, M3, and M4). For our purposes, we connected motorshield 1 to the index, middle, ring, and pinky finger. We connected motorshield 2 to both thumb motors (to account for the thumb having to move in farther, the mechanical team decided to implement 2 motors). So far, these have both taken 6 volts which we can connect straight to the motorshield using the connection seen on the bottom left of the image. The last motorshield contains our two wrist motors which are both powered by 9 volts. These motors move together to move the wrist up and down. Putting this all together, we initialized our code like this:
// Index, Middle, Ring, and Pinky Fingers on first Shield
Adafruit_DCMotor *indexMotor = AFMS1.getMotor(1);
Adafruit_DCMotor *middleMotor = AFMS1.getMotor(2);
Adafruit_DCMotor *ringMotor = AFMS1.getMotor(3);
Adafruit_DCMotor *pinkyMotor = AFMS1.getMotor(4);
// Inner and Outer Thumb Motors
Adafruit_DCMotor *thumbMotor1 = AFMS2.getMotor(1);
Adafruit_DCMotor *thumbMotor2 = AFMS2.getMotor(2);
// Wrist motors
Adafruit_DCMotor *WristMotorLeft = AFMS3.getMotor(1);
Adafruit_DCMotor *WristMotorRight = AFMS3.getMotor(2);
We can then set the speed of our motors, which in our case we found a good balance to be 200, however this value can reach up to 255.
// Set motor speed
const int MOTOR_SPEED = 200;
We then want to define how exactly our fingers are opening and closing, which can be done like this:
// Define the open and close direction of the fingers
#define OPEN_DIR FORWARD
#define CLOSE_DIR BACKWARD
To collect data, we set a sample rate of 100hz (In most situations this could go up to around 1000hz, however, for our purposes we found 100hz to be more than adequate). We also want to set up millis to make sure our data is being collecting at the proper time stamps.
unsigned long sampleRate = 100;
unsigned long previousMillis = 0;
Lastly, to prevent too many gestures from happening at once, we store the last gesture to prevent it from being done twice in a row, and initialize a boolean value checking if a gesture is in progress to ensure two gestures can’t happen at the same time.
// Store previous gesture to prevent it from being done twice in a row
String lastGesture = "";
// Make sure you can't take an input while a gesture is in progress
bool gestureInProgress = false;
Finally we can setup the code, establishing our baudrate (how fast the arduino communicates), setting our motors to stop to prevent the hand from moving when we don’t want it to, and beginning all the motorshields.
void setup() {
Serial.begin(115200);
AFMS1.begin();
AFMS2.begin();
AFMS3.begin();
stopAllMotors();
}
Next we want to set the loop which reads the sensor data. Ideally we would connect 5 sensors to our board, however we ran into a hardware issue that inexplicably left us only able to use 4 sensors. This again uses millis to ensure we stay in time. We can simply set the emg values to the analog pins on the arduino where our sensors are connected. We then print these values out for the live prediction python script to read out.
void loop() {
// Set up millis for accurate time reading
unsigned long currentMillis = millis();
if (currentMillis - previousMillis >= (1000 / sampleRate)) {
previousMillis = currentMillis;
// Read EMG values
// Note: Originally used 5 emg values but for some undetermined reason, attaching
// more than 4 prevented all of our code from working, so we switched back to
// using only 4 sensors
int emgValue1 = analogRead(A0);
int emgValue2 = analogRead(A1);
int emgValue3 = analogRead(A2);
int emgValue4 = analogRead(A3);
// int emgValue5 = analogRead(A4);
Serial.print(emgValue1); Serial.print(",");
Serial.print(emgValue2); Serial.print(",");
Serial.print(emgValue3); Serial.print(",");
Serial.println(emgValue4); // Serial.print(",");
// Serial.println(emgValue5);
}
In this same loop we can then tell the code to only run if a gesture is not in progress (see code above) AND serial data is coming through, we can then perform the gesture predicted, which can be done with this code below:
if (!gestureInProgress && Serial.available() > 0) {
String input = Serial.readStringUntil('\n');
input.trim();
Serial.print(input);
// Perform gesture based on what the python script says
if (input.length() > 0 && input != lastGesture) {
performGesture(input);
lastGesture = input;
Next we can simply map the gesture we get from the python script to a set of functions to move motors in our arduino script. For example, if we get an output of “Rock” from our live prediction file, it performs the function showRock().
We can call the function like this:
void performGesture(String gestureName) {
if (gestureName == "Rock") {
showRock();
We can then add several other ‘else if’ statements to account for other gestures which can be seen in the Github repository.
The functions for each gesture themselves are all structured very similarly. In the case of showRock(), we first set gestureInProgress as true to prevent another gesture from occuring at the same time. We then set the desired motor states for the gesture (which in this case is very simple as we want them to all be closed), we set a delay to allow the motors to move and stop them afterwards. We set another delay to hold the gesture, and then reset all the motors by doing the inverse of what we did to move the motors, again stopping them afterwards. Lastly we set gestureInProgress as false to allow the script to perform another gesture. We do this for all the gestures defined in our code. This can all be seen in the code below:
void showRock() {
// Set a gesture to be in progress so that we don't perform multiple at a time
gestureInProgress = true;
// Set which motors to move
setMotorState(thumbMotor1, true);
setMotorState(thumbMotor2, true);
setMotorState(indexMotor, true);
setMotorState(middleMotor, true);
setMotorState(ringMotor, true);
setMotorState(pinkyMotor, true);
// Wait a second for all the motors to move to positions
delay(1000); stopAllMotors();
// Hold the gesture for 1 second
delay(1000);
// Reset all the motors back to their original position
setMotorState(thumbMotor1, false);
setMotorState(thumbMotor2, false);
setMotorState(indexMotor, false);
setMotorState(middleMotor, false);
setMotorState(ringMotor, false);
setMotorState(pinkyMotor, false);
// Wait a second for all the motors to move back
delay(1000); stopAllMotors();
// Set gesture in progress as false
gestureInProgress = false;
}
Lastly, before defining our gesture functions, we want to define what true and false mean in terms of motor movement, which can be done with this code:
void setMotorState(Adafruit_DCMotor *motor, bool open) {
if (open) {
motor->setSpeed(MOTOR_SPEED);
motor->run(OPEN_DIR);
} else {
motor->setSpeed(MOTOR_SPEED);
motor->run(CLOSE_DIR);
}
}
We also want to define the stopAllMotors() function we use in our code to prevent the motors from overturning and breaking the mechanical system here:
void stopAllMotors() {
indexMotor->setSpeed(0);
indexMotor->run(RELEASE);
middleMotor->setSpeed(0);
middleMotor->run(RELEASE);
ringMotor->setSpeed(0);
ringMotor->run(RELEASE);
pinkyMotor->setSpeed(0);
pinkyMotor->run(RELEASE);
thumbMotor1->setSpeed(0);
thumbMotor1->run(RELEASE);
thumbMotor2->setSpeed(0);
thumbMotor2->run(RELEASE);
}
Although this code works effectively and doesn’t have flaws in execution, unfortunately, through our testing we found that DC motors were not at all the right tool to use as motors in this hand. Even though we power them forwards and backwards for the same amount of time, they still don't end up exactly where they started, giving us the issue that when we go do a new gesture the pulleys aren’t reacting the way we want them to. No matter how many times we reset the strings to be perfectly taught, ready to be pulled by the motor, by the time the first gesture was over, it was completely undone. Initially the code was implemented with servo motors, however due to an unfortunate miscommunication between electrical and mechanical subteams, we had to make due with DC motors for our final product, which as seen in our demo unfortunately leads to a not very consistent hand as seen from our demo. In the future, we would want to continue to use servo motors as opposed to DC motors due to the precision of servo motors, and much more ease of use (we were able to plug them directly into our Arduino unlike DC motors which we had to run through a shield). If we continue this project, this change should be the only factor holding us back from a fully functional prototype.
This site was created with the Nicepage