The mechanical system of MyoAmp translates electrical muscle signals into controlled, repeatable hand motion.
The design prioritizes modularity, durability, and user comfort while enabling multiple functional grips.
Overview
The goal of the mechanical system of MyoAmp was to create the actual orthotic system to integrate electrical parts onto the users.
This was done in a few parts: integrating boards and power electronics (bicep mount and battery mount), integrating driving system
(forearm and wrist mount), and integrating onto hand (finger mounts). We wanted to create an orthotic system that could easily be
fit to users dimensions and needs, as well as create a system that could successfully counteract cable drive with minimal
interference and discomfort.
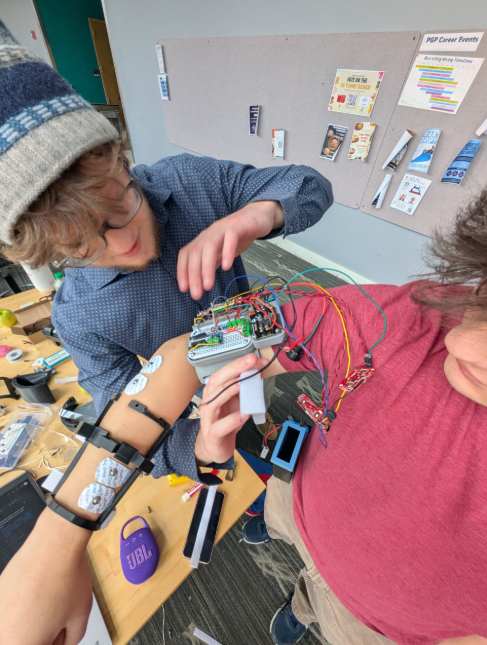
Preparing for demo
Research
We began the mechanical process by researching what current technologies exist to do what we are trying to do.
After speaking to some companies working in this sector, we came to a few conclusions about what would make a good product:
Users prefer lightweight and easy to operate over almost every other quality, making something extremely technically advanced suboptimal.
Since this is meant to be a transitional system to be used while people are recovering, long term reliability is only important if
multiple users plan to use it.
Instead of trying to cover every grip, it is much more effective to have a few key grips that are able to perform a majority of daily tasks.
With this in mind, we started designing our first design, using 3 linear actuators, some string, and some rubber bands. Since then we have
continued doing research to develop a final product.
Key Mechanical Components
Actuation System
The most critical part of the design was the actuation system.I used linear actuators going to a cable drive system on the
face of the hand. We chose to use linear actuators because it was the easiest motion to use to curl the fingers.
Flexion System
Flexion System: To complement the actuation system, I also created a flexion system. Its purpose was to counteract
the linear actuator, bringing the hand back to rest after the actuator returns itself to neutral.
Mounting System
Along with the main system, I also developed mounting systems to attach needed hardware to the fingers, wrist, forearm, bicep, and wrist.
Resting
This is the default zero-grip, all fingers are at rest (not straight, due to that causing discomfort). Whenever it is not actively
gripping, this is the orientation the hand should be in.
Pinch Grip
A grip that uses thumb, forefinger, and middle finger to pinch, best for gripping small objects.
Fist Grip (No Thumb)
A full first grip, with the exception of the thumb. It is used to grip longer objects that are harder to grip with a full fist.
Fist Grip (Thumb)
A full fist, used when gripping things for strength or for a full grip.
Made the initial finger mounts and wrist mounts, but found they were too thin and provided circulation issues. I also prototyped a forearm mount, but found a full solid mount did not work.
Next Steps
If this project is continued beyond this class, there are a few large mechanical changes that could vastly improve results.
The first would be purchasing a slightly longer linear actuator with an encoder. The issue that we ran into was that our linear actuator
was slightly too short, but the next step up was too long (since they didn’t have encoders, we couldn’t stop it part way). Having encoders
would allow us to stop it at variable distances and get how much torque the motor was using, allowing us to do more impressive things like
having more gentle grips for certain delicate objects.
Another change that would be implemented is changing the elastic material used, as well as the driving material. I chose to use rubber
bands as my elastic material to counteract cable drive, which posed problems with tensioning and wear over time. It would have been a
better choice to use a more reliable material that would be able to sustain continuous use. Along with this, I would buy more expensive
materials to create a more compliant product by making more pleasant surfaces, making it more convenient to wear.


.png)